Thyme is one of those herbs that brings both charm and usefulness to your garden. Its tiny, fragrant leaves not only make meals taste better but also draw in pollinators and add a splash of color to any sunny spot.
If you’re after a hardy, easy-to-grow herb that thrives in sunlight and poor soil, thyme’s a solid pick for gardeners at any level.

I still remember my first thyme plant—I forgot about it for weeks, sure it would die from neglect, but it just kept going. That’s when I realized thyme is stubbornly tough and forgiving, which is perfect for folks just starting out or anyone wanting low-maintenance flavor in the kitchen.
With a little care, you’ll have fresh thyme all season for soups, roasts, or whatever you’re cooking up.
Quick Tips for Thyme
Best Time To Plant
Early spring, 2 to 3 weeks before the last frost date
Sun / Lighting
Full sun for best growth; tolerates partial shade
Spacing
6 to 12 inches (15–30 cm) between plants
Soil Type / PH
Well-drained, sandy or loamy soil; pH 5.5 to 7.0
Container Info
Medium container at least 8–12 inches (20–30 cm) wide and deep; use well-draining mix
Propagation
From seeds, cuttings, or division; seeds take 14–28 days to germinate
About Thyme

Thyme is a fragrant Mediterranean herb that looks great in the garden and brings flavor to lots of recipes. As a woody perennial, it comes back year after year and barely asks for anything once it’s settled in.
Thyme Growth Habits
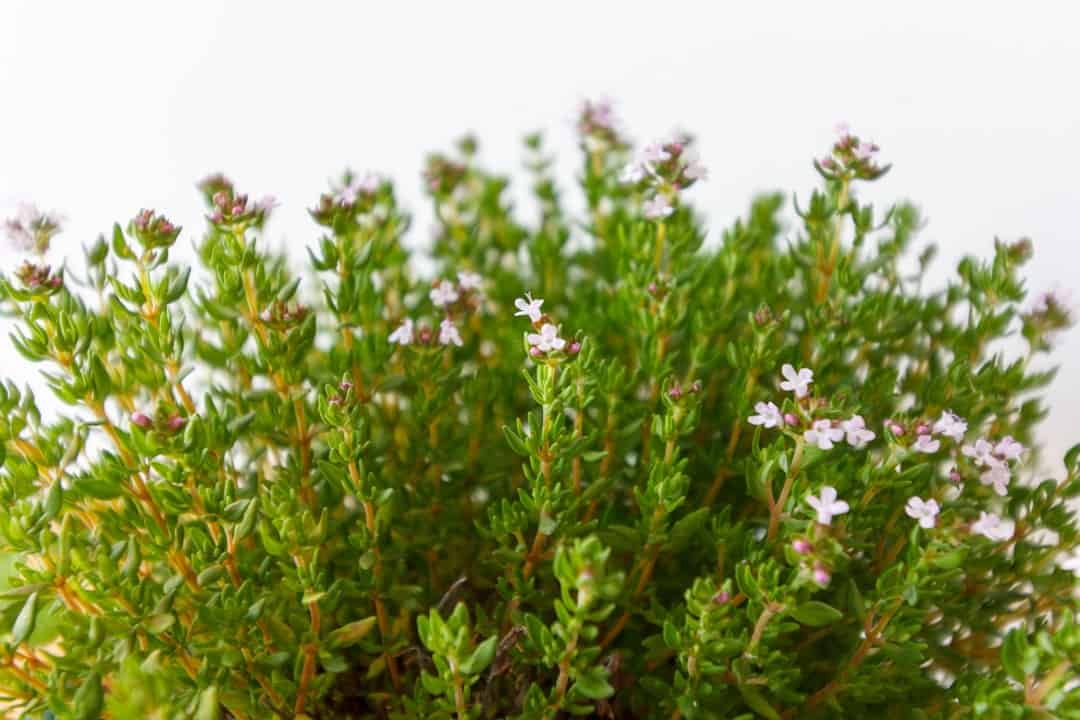
Thyme plants are low-growing perennials with small, aromatic leaves and tiny flowers in white, pink, or purple. The main species for cooking is Thymus vulgaris, but there are plenty of others for both culinary and ornamental use.
You’ll see thyme thriving in warm, sunny spots, forming mats or low bushes that slowly spread out as they mature. It’s happiest in dry, well-drained soil and shrugs off drought, so it’s a natural fit for Mediterranean-style gardens.
It’s also surprisingly tough—thyme can handle a bit of foot traffic if you plant it between stepping stones. The leaves often stay green through mild winters and give off a lovely scent if you brush past them.
Blooms usually show up in late spring or early summer, drawing bees and pollinators. You can grow thyme in beds, borders, or containers, so it works even if you just have a balcony or a small patio.
Growing Zones for Thyme
USA:
- Zones 5a–9b, temperate to warm climates.
- In cooler zones, provide protection from harsh winter conditions or grow as an annual.
Australia:
- Temperate, subtropical, some arid areas
- Prefers sunny, sheltered spots; in hot regions, provide afternoon shade
Varieties Of Thyme

Thyme comes in all sorts of shapes and flavors. Trying out different types can be fun and helps you find what fits your space and taste best.
English Thyme (Thymus vulgaris)
Appearance: Upright growth with tiny, gray-green leaves; reaches about a foot tall.
Flavor: Classic, robust, and savory—what most people associate with “thyme.”
Best Use: All-purpose cooking.
French Thyme (Thymus vulgaris ‘French’)
Appearance: Finer, more delicate green leaves than English thyme.
Flavor: Delicate and subtle, milder than common thyme.
Best Use: Stews, soups, and container gardens.
Lemon Thyme (Thymus citriodorus)
Appearance: Small, variegated leaves with golden or lemon-yellow tones.
Flavor: Bright, citrusy, and fresh.
Best Use: Fish, chicken, salads, and as a garnish.
Creeping Thyme (Thymus serpyllum)
Appearance: Low-growing, mat-forming ground cover just a couple inches tall.
Flavor: Mild and floral.
Best Use: Ground cover, pathways, and filling gaps in the garden.
Caraway Thyme (Thymus herba-barona)
Appearance: Small leaves with pink flowers.
Flavor: Spicy and earthy, reminiscent of caraway seeds.
Best Use: Specialty dishes and for unique garden interest.
If your area gets dry summers or tough winters, most thyme types will still do fine since they’re drought-tolerant and pretty hardy. It’s worth checking which varieties do best where you live, though.
Tips for Variety Selection
Pick creeping or low-growing thyme if you’re after easy ground cover or something for a rock garden.
For cooking, English or French thyme is usually the way to go.
Lemon thyme is great if you’re craving something a bit different in summer dishes.
Planting Thyme

Thyme does best if you pay attention to sunlight, soil, and how you’re starting your plants. A bit of planning goes a long way, whether you’re growing outside, in pots, or starting from seeds or cuttings.
When To Plant
Plant thyme outdoors after the last frost in spring, once the soil’s warming up to at least 60°F (16°C).
If you’re starting seeds inside, sow them about 6-8 weeks before your area’s last frost. Young plants or seedlings can go outside once nights are reliably above freezing.
For most people, that means planting in late spring, but if you’re in a warm area, late fall can work too.
Thyme does well in USDA zones 5-9 and in Australian regions with mild winters and warm summers. If you’re in a colder spot, try starting thyme indoors in pots to get ahead.
Where To Plant
Thyme really loves full sun—shoot for at least 6 hours a day. Pick a spot with good light and some air flow.
The soil should drain well and never stay soggy. Sandy or rocky soils are ideal. Thyme likes a soil pH between 6.0 and 8.0, with around 7.0 being the sweet spot.
If your soil’s heavy clay, mix in some coarse sand or gravel to lighten it up. You could also use a raised bed for better drainage. Skip shady or damp spots that trap moisture.
Container/Small-Space Growing
You don’t need a big yard to grow thyme. Pots, window boxes, and small raised beds all work just fine.
Pick a container at least 8 inches (20 cm) wide, with drainage holes. Use a sandy or gritty potting mix—skip plain garden soil.
Put your container somewhere sunny, like a south-facing window or patio (north facing in Aussie). In winter, move indoor pots if it get really cold to the brightest spot you’ve got.
Check that the soil isn’t staying soggy. Let the top inch (2.5 cm) dry out before watering again. Thyme can handle drought, but not wet feet.
How To Plant
Space young thyme plants or seedlings about 12 inches (30 cm) apart. That gives them room and airflow. Plant at the same depth they grew in the nursery pot.
If you’re planting seeds, scatter them thinly on prepped soil and cover lightly—they need some light to sprout. Mist gently and keep the soil just barely moist.
For pots, fill loosely and don’t press the soil down too much. After planting, water gently and let them adjust in filtered sunlight for a few days.
Before moving seedlings outside, harden them off by setting them outdoors for a few hours a day, adding more time each day.
Propagation
There are a few ways to make more thyme plants:
Seeds: Best started indoors. They take 2-3 weeks to sprout. Keep them warm and lightly moist.
Cuttings: In spring or early summer, snip a 4-inch (10 cm) healthy stem. Strip the lower leaves. You can dip the cut end in rooting hormone if you want, then plant in moist sand or potting mix. Cover with a clear bag to keep it humid until roots form.
Layering: Bend a low stem to the soil, cover part of it with earth, and weigh it down. Once it roots, cut it away and transplant.
Division: Every few years, dig up mature thyme and gently split it into smaller sections to replant.
I first tried rooting cuttings after accidentally snapping a stem while harvesting—turns out, thyme really is forgiving. Starting with cuttings gives you a quick, sturdy new plant.
Any of these methods work. For beginners, cuttings and transplants are probably the easiest way to get a good start.
With a little patience and some care, you’ll have more thyme than you know what to do with—and maybe even enough to share.
Care And Maintenance Of Thyme

Thyme is easy to care for if you stick with a few simple routines. Pay attention to watering, feeding, and trimming if you want healthy, bushy plants that last.
Watering Needs
Thyme likes soil that dries out between waterings. Water deeply but only when the top inch (2.5 cm) feels dry. Overwatering is the biggest risk—damp soil can cause root rot, especially in cooler or humid places.
In summer, check thyme twice a week, especially if it’s in a pot. Garden thyme usually needs less water, since mature plants are more drought-tolerant. If the leaves turn yellow or the stems look limp, you’re probably watering too much.
A thin layer of mulch—like pebbles or coarse sand—helps keep the soil from staying too wet and keeps weeds down. In fall, cut back on watering as growth slows. During winter, thyme can go weeks without water unless it’s unusually dry.
Fertilizer
Thyme doesn’t really crave extra feeding. In fact, too much fertilizer makes it grow fast but kind of waters down the flavor.
Stick with light, infrequent feeding for the best results. If your soil is on the poor side, toss in a balanced, slow-release fertilizer just once in early spring.
Use only half the recommended amount—thyme’s happier in leaner soil. Don’t bother feeding late in the season; new growth then just gets zapped by cold weather anyway.
For pots, go with a diluted liquid organic fertilizer every eight weeks or so during the main growing months. If you notice pale leaves or sluggish growth, try a little compost or fish emulsion.
Pruning
Pruning thyme keeps things tidy and stops it from turning into a woody mess. Right after the flowers fade—usually late spring or early summer—is the sweet spot for a trim.
Use clean, sharp scissors or garden shears. Trim back the top third of each stem, but always leave some green so the plant bounces back.
Snip off any dead or brown stems at the base. This encourages fresh shoots and keeps the plant compact.
Each fall, do a light tidy-up by trimming away straggly bits. Save the big haircut for after flowering.
If your thyme gets woody after a few years (it happens), consider starting a new plant from a cutting. That way, you keep things bushy and productive.
Thyme Problems And How To Fix Them

Thyme’s tough and drought-tolerant, but it’s not invincible. Pests, diseases, and a few growing hiccups can still mess with your plants.
Pests
Most pests avoid thyme, but a few can still cause trouble. Aphids are the most common, clustering on new shoots and stems and leaving sticky residue behind.
Spider mites may appear in hot, dry weather, and thrips can cause silvery or twisted leaves. Deer, rabbits, and most critters usually ignore thyme, and birds rarely bother with it.
Aphids
Symptoms: Clusters of tiny green, black, or white bugs on new growth; curled or sticky leaves.
Solution: Spray with a strong jet of water or use insecticidal soap. Ladybugs and other beneficial insects help keep aphid numbers down.
Spider Mites
Symptoms: Fine webbing on leaves, yellow speckles, and leaf drop in hot, dry spells.
Solution: Increase humidity around the plant, spray with water, or use insecticidal soap if needed.
Thrips
Symptoms: Silvery patches, streaks, or twisted leaves.
Solution: Remove damaged leaves and improve air circulation. Sticky traps and predatory insects can help.
Keeping thyme weed-free and avoiding overcrowding helps reduce pest problems.
Diseases
Most disease issues in thyme are related to excess moisture. Root rot is the biggest threat, but powdery mildew can also appear if air circulation is poor or leaves stay damp.
Root Rot
Symptoms: Yellowing leaves, wilting, mushy or blackened roots, and a musty smell at the base.
Solution: Use well-draining soil and containers, water only when the soil is dry, and never let pots sit in water. Remove badly affected plants.
Powdery Mildew
Symptoms: White, powdery spots on leaves and stems, especially in humid or crowded conditions.
Solution: Improve airflow by pruning and spacing plants, avoid wetting leaves, and remove infected parts quickly.
Good drainage, letting the soil dry between waterings, and pruning for airflow are key to disease prevention.
Growing Problems
Thyme is low-maintenance, but it does have a few sensitivities. Too much water or too little sun are the most common issues.
Slow or Spindly Growth
Symptoms: Thin, pale, or stretched stems; not much new growth.
Solution: Move thyme to a sunnier spot (at least 6 hours of direct sun), and avoid overwatering.
Yellow Leaves & Floppy Stems
Symptoms: Leaves turn yellow or droop, stems become weak.
Solution: Check for soggy roots and improve drainage. Water only when the top inch of soil feels dry.
Rootbound Plants
Symptoms: Roots poking out of the pot, stunted growth.
Solution: Repot into a larger container and give each plant about 12 inches (30 cm) of space.
Woody Stems
Symptoms: Lower stems become tough and woody, fewer leaves.
Solution: Trim thyme regularly to encourage new, leafy growth and remove old, woody stems.
Check your thyme’s sunlight, watering, and drainage if it’s not thriving—these are usually the root of most problems!
Harvesting Thyme

Fresh thyme from your own garden? Pretty satisfying. Timing your harvest right keeps the plant happy and the flavor at its best.
When To Harvest
Wait until your thyme is well established—usually the second season. The best time to pick is just before it flowers, when the oils (and flavor) are at their peak.
Mornings are ideal, after dew dries but before the sun gets too intense. If you only need a sprig or two, grab them whenever.
For bigger harvests, snip the top 5–6 inches (12–15 cm) of the soft, green growth. Leave the woody stems alone.
Don’t go wild harvesting in the first year; let the plant build strong roots. Once it’s settled in, you can take several small harvests through the season.
Honestly, frequent light picking seems to make the plant bushier and healthier.
How To Harvest
Use clean, sharp scissors or pruners to cut the stems. Snip just above a leaf node or side stem—this encourages branching and regrowth.
Don’t yank or tear the stems, since that can damage the plant. Remove flowers as they pop up; that keeps the plant focused on making new leaves.
Harvesting a lot? Bundle stems and hang them upside down to dry somewhere cool and out of the sun.
For daily use, just pick what you need. To get only the leaves, run your fingers along the stem from base to tip and strip them off. Use them fresh or dry for later.
Always leave some stems and foliage behind so the plant can recover and keep growing.
Storing Thyme

Storing thyme properly keeps its flavor and aroma at their best, whether you’ve just picked a bunch from the garden or brought some home from the market. Here are some simple ways to make your thyme last:
Room Temperature Storage
Duration: 2–3 days
Best For: Quick use (fresh sprigs for cooking or garnishing)
Keep thyme stems in a glass of water on the counter, just like cut flowers. Change the water daily and keep out of direct sunlight. Thyme will stay perky for a couple of days.
Refrigerator Storage
Duration: 1–2 weeks
Best For: Preserving freshness for longer recipes and meal prep
Wrap thyme loosely in a damp paper towel and place it inside a plastic bag or airtight container in the fridge. This helps keep the leaves from drying out and extends their shelf life.
Drying
Duration: 6–12 months
Best For: Long-term storage and seasoning
Tie small bunches of thyme together and hang them upside down in a warm, airy spot until the leaves are crisp. Strip the dried leaves and store in an airtight jar away from light and heat.
Freezing
Duration: Up to 6 months
Best For: Keeping thyme handy for soups, stews, and sauces
Wash and dry thyme sprigs, then freeze them whole in a sealed bag, or chop the leaves and freeze in ice cube trays with a little water or olive oil.
Preservation Tips
Always wash and thoroughly dry thyme before storing to prevent mold.
Label containers or bags with the date so you use the oldest first.
Don’t leave fresh thyme uncovered on the counter—it will wilt and lose flavor quickly.
Benefits and Uses of Thyme

Thyme brings an earthy, layered flavor to food and honestly, it’s hard to beat its versatility. You can use it fresh or dried, so it’s easy to sneak a bit of garden magic into everyday meals.
It’s also a staple in family recipes—think hearty soups or roasted potatoes that just taste like home.
Cooking With Thyme
Thyme’s flavor is earthy, a little minty, and it pairs with so many foods. Fresh leaves are perfect on roasted veggies—especially potatoes and tomatoes—while dried thyme shines in slow-cooked meals.
This herb is a natural fit with Mediterranean flavors like rosemary, sage, and lavender. I always toss it into a bouquet garni for soups or stews.
Love cooking meat? Sprinkle thyme over chicken or lamb before roasting. It’s not just tasty; the oils can even help preserve food as it cooks.
Try infusing olive oil or butter with thyme for a quick flavor boost—great on bread, pasta, or grilled veggies.
Quick Tip
Strip fresh leaves from stems before using.
Add dried thyme early in cooking so it has time to release flavor. Pairs best with roasted tomatoes or root vegetables.
Family Recipes
Family meals just feel cozier with thyme in the mix. Here are a few favorites you might want to try:
Classic Chicken Soup: Drop in a sprig of thyme with carrots and potatoes for extra herbal goodness.
Roasted Potatoes with Thyme: Toss quartered potatoes with olive oil, salt, pepper, and fresh thyme. Roast at 400°F (200°C) for 30–40 minutes.
Herbed Butter Spread: Mix soft butter with chopped thyme, rosemary, and sage. Slather on warm bread or melt over grilled meats.
Tomato and Thyme Pasta Sauce: Add fresh thyme and maybe a touch of lavender to simmering tomato sauce. It’s great on spaghetti or roasted veggies.
Australian Lamb Chops: Rub lamb with garlic, olive oil, salt, and fresh thyme before grilling.
Using thyme makes meals feel a little more special, whether it’s a regular weeknight or a big family get-together.
Frequently Asked Questions
You’ll find ways to start thyme from cuttings and seeds, ideas for container growing, and some advice on keeping thyme happy indoors. These answers zero in on simple, reliable methods and what to expect, so you can get your own homegrown thyme going without too much fuss.
What are some effective methods for propagating thyme using cuttings?
Snip healthy, non-flowering stems about 4 inches (10 cm) long from a mature plant. Pull off the lower leaves and, if you’ve got some rooting hormone, dip the ends in it.
Stick the cuttings in damp potting mix or just a glass of water, and keep them somewhere bright but not blasted by direct sun.
Roots usually show up in 2–4 weeks. Once you see roots and a bit of new growth, move the cuttings to small pots or plant them straight into your garden.
What steps should we take to ensure thyme thrives when grown indoors?
Find the sunniest window you’ve got—thyme wants at least 6 hours of direct sunlight. If that’s not possible, a small LED grow light can help.
Keep the temperature between 60–75°F (16–24°C), and don’t let the leaves touch cold glass. Check the soil before watering; thyme prefers things a bit on the dry side.
What is the typical timeline for thyme to mature from planting to harvest?
If you’re starting from seed, thyme usually takes 12–16 weeks to get big enough to harvest. If you start with cuttings or nursery plants, you might be snipping your first stems in 6–8 weeks.
Harvest leaves as you need them, but hold off on any big cut until the plant is at least 6 inches (15 cm) tall.
Which companion plants work well alongside thyme to promote a healthy garden?
Thyme’s a fan of full sun and drier soil, so it pairs up best with herbs and veggies that feel the same way. Some good neighbors for thyme are:
- Rosemary
- Sage
- Oregano
- Lavender
- Tomatoes
- Strawberries
Honestly, tossing thyme near tomatoes is a classic move—its scent can help keep a few pests at bay.
On the flip side, steer clear of planting thyme next to water-loving plants like mint or basil, since they’re after more moisture than thyme can handle.
As you watch your thyme grow, don’t stress if things aren’t perfect. Even the scrappiest plants have something to teach—trust me, I’ve had to thin out crowded thyme seedlings more than once.